Although concrete is very durable, sometimes you may find that you need to replace one or more blocks of paving tiles. Part of the paving or even an individual tile can sag due to small ground movements or heavy use, and this can cause rainwater to accumulate in puddles. Learn the best way to repair damaged pavement.
If a slab has sagged or been damaged, it’s fairly easy to lift it up and either re-pave or replace it.
Sidewalk Tile Size and Color
There may be a difference in size and color between an older paving tile and the new one you purchase for replacement (even if you go to the same manufacturer). If you need to replace an old slab, see if you can take it from a different location in your patio (like a wall) and use it to replace a broken one.
You can stick the mismatched slab against a wall where it will stand out less, or fill the gap with soil and plants.
Safety first
Don’t risk getting hurt. If you are laying slabs larger than 1 Square Foot, get someone to help you lift and stack them.
How to replace old tiles with new ones
Step 1 Protection

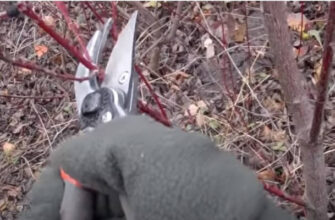
After making sure you are wearing protective goggles and sturdy gloves, clean the seal around the stove with a chisel and mallet.
Step 2 Lift the slab

Lift the slab with a shovel, using a scrap of wood to protect the slab next to it.
Step 3 Holder

Insert a round wooden holder under the slab and roll it to the side.
Step 4 Removing Debris

Break up and remove the old mortar with a drill bit and hammer. If the slab was placed on sand, level it with a wooden bar and add more sand if necessary.
Step 5 Press the plate into position

If the slab was laid on mortar, wet the back side and place it on a fresh layer of mortar. Make sure it matches the surrounding slabs. Then use a trimmer and baton to push the slab into position and fill the joints with dry mortar.
When is it necessary to repair or replace paving tiles?
There are no eternal materials, so even the highest quality and most expensive pavements wear out over the years under the influence of weather factors. Surfaces receive various mechanical damages, such as accidental bumps, failure to comply with the rules of operation.
The monotony often gets boring, so the owners change even good, but already boring paving tiles for a new one. The owner wants to implement an interesting project, and this requires the dismantling of the existing pavement and the installation of a new one.
Sidewalk restoration may be necessary for any of three reasons.
Sagging areas
Occurs due to improper preparation of the base: the cushion is either missing, or it is made incorrectly.
Cracking
Probably due to overloading (you put thin blocks in the parking area), extreme temperature fluctuations or severe frost.
Falling out of curbs
This can be due to improper installation or heavy loads.
Ways to eliminate tile deficiencies
There are four of them in total:
- Replacement of sidewalk tiles (if they are cracked due to high loads or frost);
Repair areas that have sagged (after heavy rains or frost, probably due to improper preparation of the base or its complete absence); - Cleaning of gutters (if the system under the pavement is clogged);
- Repair of the curb (improper installation or mechanical damage).
Consider each of them.
Tile replacement
- To repair and replace paving stones you will need the following tools:
- A regular hammer;
- A hammer with a rubberized tip;
- Level tool;
- A mortar or filler;
- A crowbar (you can replace it with a chisel).
First, you need to extract the damaged elements with a chisel, which is hammered into the joint. Work should not be hurried, otherwise, there is a risk of damaging the adjacent elements. After the blocks are removed, remove the layer of old backfill, pour fresh backfill, and install new tiles. If the old elements were laid on cement, the new ones should also be placed either on the cement or on the glue.
The next step is caulking (done either with sand or cement, based on the material of the overall coating).
If the surface has been damaged due to temperature fluctuations, it should be treated with a protective impregnation.
Repair sagging areas
Renew the paving tiles in such a case according to the following algorithm:
- Removing sagging tiles from damaged areas. The area to be renewed should be rectangular and larger than the problem area by at least 1 meter;
- Removing the layer of sandy backfill;
- Removing the crushed stone layer (if it has subsided);
- Watering the ground with water;
- Compacting with a rammer (manual or mechanical);
- Backfilling and compacting of crushed stone;
- Backfilling and compacting sand;
- Cleaning the old removed tiles, and laying them in place.
Cleaning the gutters
The first thing to do is to check whether the grids of the gutters are intact. After that, the pipes are cleaned with a sewer cleaning rope or by applying water under high pressure.
Next performed or repair paving tiles, or their replacement in accordance with the recommendations in the first and second paragraphs.
Repairing the curb
The algorithm is as follows:
- Digging up the ground near the damaged element;
- Removing 2-3 rows of tiles near it;
- Extraction of the curb with a crowbar;
- If the curb is in normal condition – clean it from the concrete, if badly damaged – purchase a new one;
- Work with the planting place: cleaning, watering, compacting with a rammer;
- Installation of the curb;
- Pouring of concrete mortar;
- Waiting for one day;
- Backfill crushed stone and sand;
- Ramming;
- Laying in place of the removed tile elements;
- Watering.
To remove worn parts of the cloth, you can use improvised means. Usually, a trowel, spatula, or axe is used for this purpose. Work begins with capturing the end of the element: the end is pushed up and lifted. At the same time, it is necessary to pull up the product on one side, and then proceed to the other. These manipulations are performed along the perimeter of each tile until its complete release from the cell. After removing the first part (the most time-consuming process), it becomes much easier to dismantle.
Tools for repair work
To repair or replace individual areas by your own efforts, you will need a trowel, a flat screwdriver, a stone hammer and a rubber hammer (it is required for a reliable fixation of the coating to the sand cushion). You will also need protective clothing, goggles, gloves, and other safety items.
Dismantling the old pavement
To remove worn parts of the cloth, you can use improvised means. Usually, a trowel, spatula, or axe is used for this purpose. Work begins with capturing the end of the element: the end is pushed up and lifted. At the same time, it is necessary to pull up the product on one side, and then proceed to the other. These manipulations are performed along the perimeter of each tile until its complete release from the cell. After removing the first part (the most time-consuming process), it becomes much easier to dismantle.
Replacing paving stones
If it was necessary to lay a new pavement, you should first level the underlayment, if necessary. After removing the old elements, the base becomes uneven, with depressions, bumps, and pits. If you do not perform alignment, the new products will not lay properly. In addition, it is necessary to add backfill, since the installation of the pavement requires its compaction.
The choice of sand density will determine the stability of the path, otherwise, after some time you will need to re-lay, which will take a lot of time and effort. To strengthen the surface, a garden curb is used – with its help, the individual elements will not separate when fixed.
Experts advise tapping each element with a rubber hammer to increase the density of the coating.
Finishing measures to repair and replace the material
After dismantling the old paving stone and laying the new one, it is necessary to perform finishing work, which ensures surface stability and attractiveness. To do this, sand is poured into the joints with the help of improvised means – broom, broom or manually. The latter method is the most effective, in which the backfill is inserted more densely into the gaps between the tiles. The excess material is removed from the surface.
After a few days, the sand is compacted and a little more is added if there is significant subsidence. If you provide watering of the joints, the strength of the laid surface will increase.